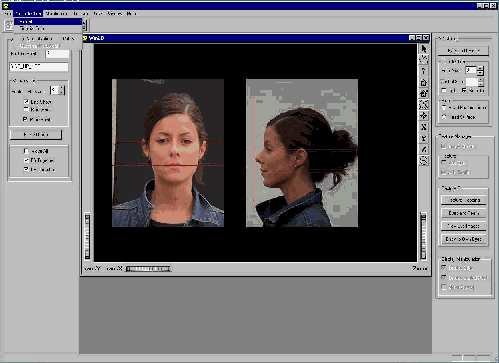
Figure 1. Normalization of the two images
1. Take two photos as guided in 'FacePictureTaking.html' in the same directory.
2. Save them into 'FaceData' directory. Rename them as 'XXX_FV.jpg'
and 'XXX_SV.jpg'. To rename the file, use Exploring, select FaceData directory
and click the right button on the filename. When a menu appears, select
Rename and change the filename.
Resize and/or rotate the photos if necessary. There are several basic
rules to observe in order to obtain a correct cloning session. It is necessary
to manipulate/transform the images to a resolution close to approximately
400 pixels by 600 pixels. These modifications can be executed with Paint
Shop Pro, Photoshop and other imaging softwares. The user should select
the image resizing options and re-define scale values. It is also extremely
important that these images are taken with care since a face that is not
straight along the border of the image will need some retouching such as
rotating the images either by typing in the values or manually rotating
the images.
3. Launch the FaceCloner program.
4. Read in the images either (1) by pressing 'Open Images' button on the toolbar or (2) by choosing 'File-Read-jpg Images' from the menu. In the dialog box, select any of the two images.
5. Move with the mouse (click down and drop) the upper horizontal lines
to outer end of the right eye in the frontal and the side views. Similarly,
move the lower horizontal lines to fit the right corner of the lips on
the frontal and the side views. Choose in Normalisation menu, 'Normalization-Height'
from the menu to save it (Figure 1).

Figure 1. Normalization of the two images
6. In a similar manner, move the upper horizontal and the vertical lines to fit the tip of the nose on the frontal and side views. Choose 'Normalization-Fiducial' from the menu to save it (Figure2).
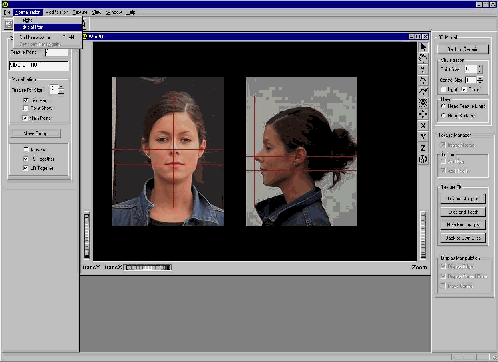
Figure 2. Normalization of the two images (Fiducial)
7. Perform Normalization either (1) by pressing 'Do Normalization' button
on the toolbar or (2) by choosing 'Normalization-Do Normalization' from
the menu. The resulting window is shown in Figure3.
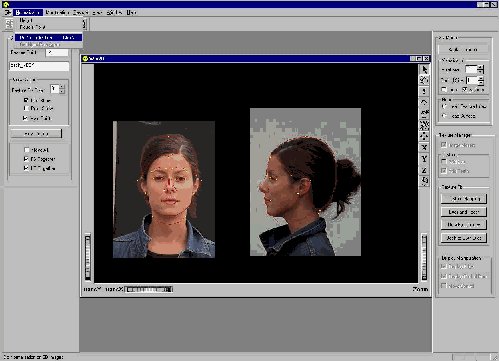
Figure 3. After normalization
8. You will see a several yellow points on top of pictures. These points are called 'the main points'. Now, adjust and reposition 'the main points' in a proper position. When you click on a point on the 2D image window, you will find the corresponding point is highlighted in the 3D model window.
The following are the steps to move the yellow points:
a. first, adjust the side image
b. uncheck the option 'FS together'
c. adjust the right side of the frontal image
d. uncheck the option 'LR together'
e. adjust the left side of the frontal image
9. When you press 'Move Group' button in the 2D image frame, the red lines carry 'point show' that moves with the new 'yellow point' positions.
10. Check the 'point show' from the 2D image frame to show all the feature points, which can be also repositioned with the similar method as the main points.
11. Afterwards, save these points information either (1) by pressing
'Save 2D Coord' button in the toolbar or (2) by choosing 'file-Save-2D
Coord' from the menu. Figure4 shows an example of point locations.

Figure 4. Feature detection
12. Modify the generic model in the Win3D window either (1) by pressing 'Modify 3D model' button in the toolbar or (2) by choosing 'Modification-Feature Modification' from the menu (Figure5). You can show the deformation of the generic model with facial features. If you want to correct the facial deformation, it's possible to modify 2D feature points and check again Modify 3D model. In '3D Model', the 'Back to Generic' button is used for reloading the generic model. Check and modify the shape by rotating the head and by adjusting the four points on the cheeks. When the face modeling is satisfactory, you can calculate the texture.
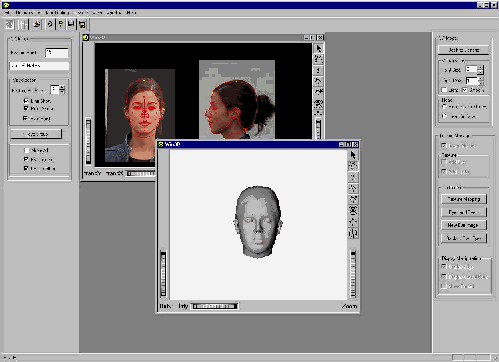
Figure 5. Modification of the 3D model
13. Open the Texture window by choosing 'Texture-Texture Fitting Window'
from the menu. Press 'Texture Mapping' button from the Texture Fit frame.
Texture generation and the mapping stage will take about 20 seconds.
If you see wrong texture position on the face, it's possible to adjust
the texture coordinate points in Texture window. Select which point you
want to move and "click and drop" it. You can see the result directly on
the 3D model. Note: Please use your judgment carefully since it's not possible
to undo this action!
See Figure 6.
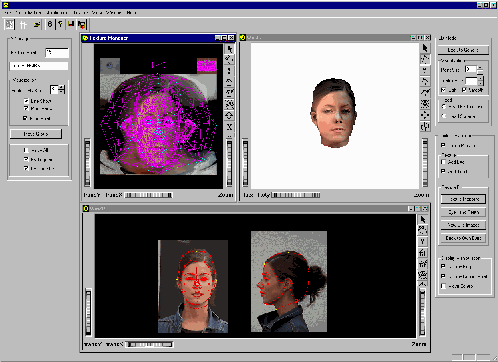
Figure 6. Texture image generation and mapping
14. You can get better results by turning on the second light in the Win3D window. The light check box is in the 3D model frame.
15. Press 'Save All' button in the toolbar to save all the files.
 |
MIRALab, University of Geneva
Hyewon Seo WonSook Lee Director : Prof. Nadia Thalmann |