First part

Objectives

  • Create a doubly linked list containing a dummy node.
  • Modify the implementation of a linked list to add methods.
  • Resolve problems that require knowledge of interfaces.

Circular queue

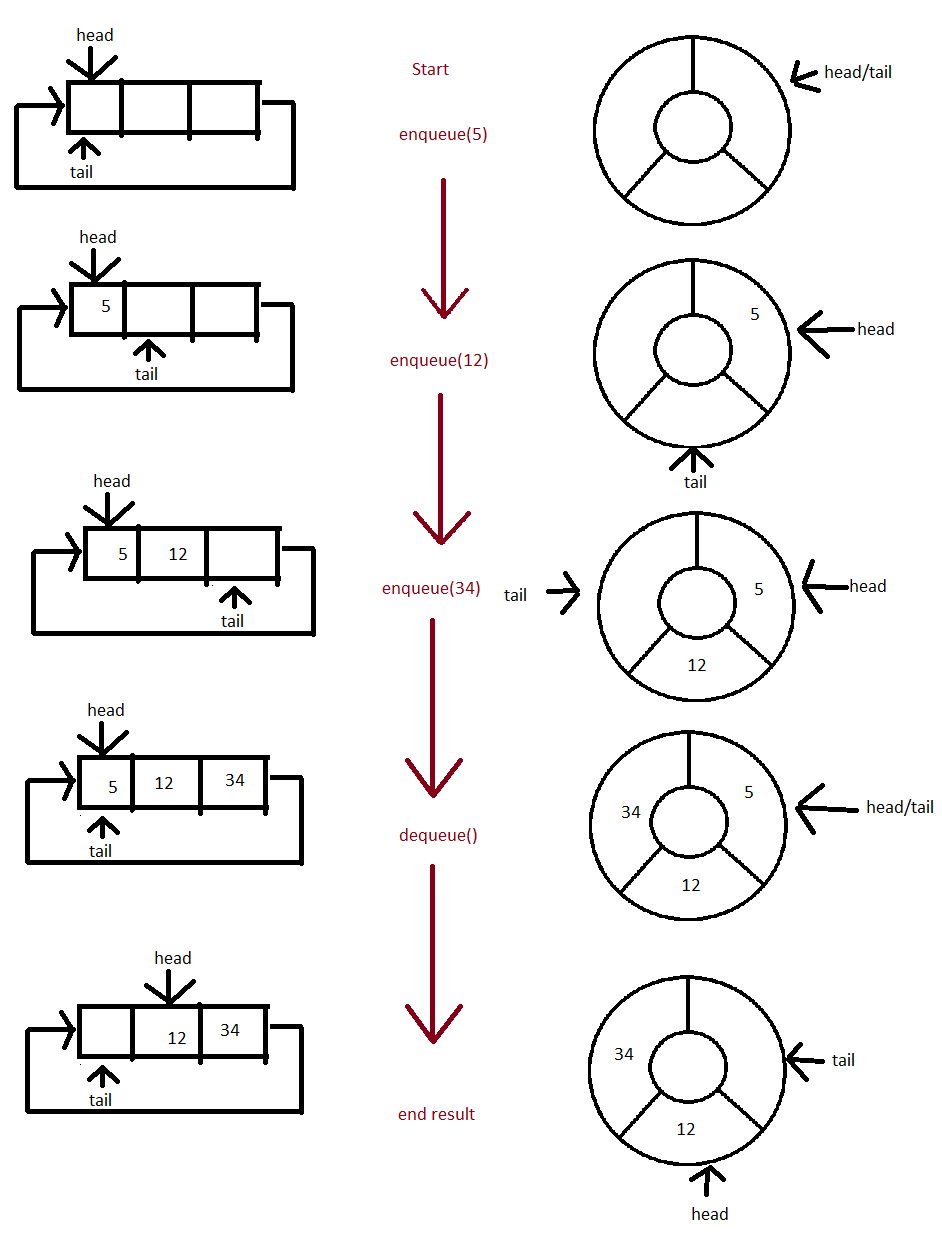
Circular queues are a type of queues that implements the principle of First In First Out (FIFO). In these queues, the last element is linked back to the first in order to create a loop. These queues use one instance variable for the head of the queue and one for the tail of the queue.

When we add an element using enqueue(), we add the element at the position of the tail and increment the pointer tail. When we remove an element using dequeue(), we remove and return the element at the position of the head pointer and increase that pointer.

Here is a visual representation of a circular queue and its use. We can represent it via an array where the last element links to the first, or like a circular array.

Visual representation of a circular queue

Figure 1 : Visual representation of a circular queue.

Singly and doubly linked list

Reminder: we have seen in class that there are several implementations for a list using linked elements. We have discussed singly- and doubly-linked list. These implementations, however similar they might be, have some important differences.

Singly-linked lists link each elements to the next one in the list, up to the last element, whose next is null.

Doubly-linked lists allow faster implementation of some methods thanks to the link between each element and the previous one. The next of the last element will be null just like the prev of the first element will be null.

It is also possible to implement a (doubly- or singly-)linked list using a dummy node. A dummy node has a null value and is placed at the beginning of the list. This allows for a simpler implementation of the methods by reducing the number of special cases and allows the list to be circular since the first element is linked to the last one via the dummy node.

Test your knowledge of the different implementations.

Question 1.0 :

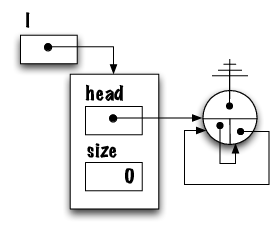
Describe the following image. Particularly, is this a singly or doubly linked list? What is this technique called ( a … node)?

See image

Question 1.1 :

True or false? It is possible go through a singly linked list in both directions efficiently.

Answer
Question 1.2 :

What can we do to make it easier to add an element at the end of a list? (without needing to traverse the entire list first)

Answer
Question 1.3 :

True or false? A circular list using a dummy node will have many special cases.

Answer
Question 1.4 :

In what cases is the use of a list implemented using an array more efficient than with a list using singly-linked elements? (name 2 methods).

Answer
Question 1.5 :

Do we need to have a pointer tail in a circular doubly-linked list?

Answer
Question 1.6 :

True or false? To implement a linked list, we can simply use a dynamic array

Answer
Question 1.7 :

Here is the constructor of the nested class node for a list. Is the list singly or doubly linked?

//constructor
private Node(T value, Node next) {
	this.value = value;
	this.next = next;
}
Answer
Question 1.8 :

What does the following code do in a circular doubly-linked list? Consider that the variable current was previously declared.

current = head.prev;
while (current != head) {
	current = current.prev;
}
Answer

Second part

OrderedStructure

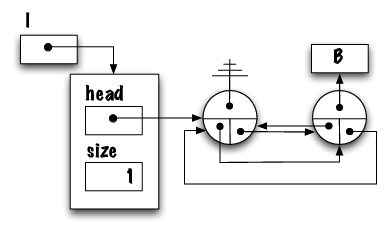
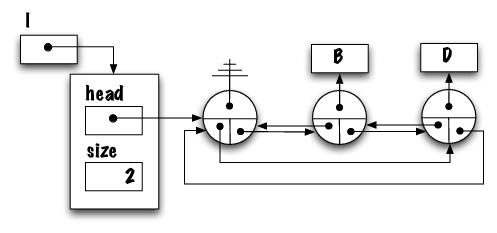
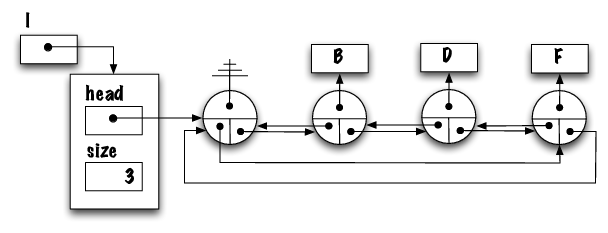
You are now ready to apply your knowledge. Consult the slides on Brightspace concerning the implementation of a doubly linked list if necessary. Refer to the images in appendix to help you visualize your list. Do not hesitate to draw the list when you are writing your implementation!

For this laboratory, you will create a (doubly) linked with a dummy node list implementation of the interface OrderedStructure, which declares the following methods:

public interface OrderedStructure {
	int size() ;
	boolean add(Comparable element) throws IllegalArgumentException;
	Object get(int pos) throws IndexOutOfBoundsException;
	void remove(int pos) throws IndexOutOfBoundsException;
}

Implementations of this interface should be such that the elements are kept in increasing order. The order of the elements is defined by the implementation of the method compareTo( Object obj ) declared by the interface Comparable. The classes Integer and String both implement the interface Comparable, you can use these for the tests. Objects of any other classes that implement the interface Comparable can be stored in an OrderedList.

IMPORTANT : Since the main objective of the laboratory is to study doubly linked lists, generics will not be used. Since generics are not used,

  1. some warnings will be issued when compiling the source code. But also,
  2. the type of the return value of the method get( int pos ) will be Object. Hence, the users of the class will be forced to use a type cast when accessing the content of an OrderedList.

OrderedList

  1. Create an implementation for the interface OrderedStructure. This implementation, called OrderedList, will use doubly-linked (with a dummy node) nodes and should have a head pointer. Furthermore, the implementation should throw exceptions when necessary. Here are the files that you will need:

    Here is a step-by-step approach for implementing the class OrderedList. This will be a top-down approach, focusing on the general organization of the class first (adding the variables, the nested class, as well as empty methods). Once, the overall implementation is complete, we will implement the methods one by one.

    1. First, let’s create a template for the class. At this point, we are ignoring details such as the implementation of the body of the methods, and instead we are focusing on the necessary variables and the need for a static class called Node. This template needs to contain a static nested class called Node, the necessary instance variables, and empty definitions for all the methods of the interface OrderedStructure. You should not use a variable int size in this implementation. Also, the class Node should save a value of type Comparable.

      The compiler will not allow us to have empty declarations for the methods that return a result. To circumvent this problem, we could add a “dummy” return statement, such as returning the value -99 for the method size.

      However, we may later forget to change the implementation, and this will cause all sorts of problems. Because of this, it is better to create an initial method that consists a throw statement.

      int size(){
      	throw new UnsupportedOperationException("not implemented yet!");
      }

      Do the same for every method.

      You can now compile the class and start working on the implementation of the methods one by one. Any attempt at using a method that has not been implemented yet will be signaled with the proper exception to remind us that we still have to implement that method. You can ask your TA for further information if needed.

      You can now compile the class and start working on the implementation of the methods one by one. Any attempt at using a method that has not been implemented yet will be signaled with the proper exception to remind us that we still have to implement that method. You can ask your TA for further information if needed.

      Create a test class called OrderedListMain; at this point it will contain only a main method that declares an OrderedList and creates an OrderedList object.

      Make sure that your implementation is correct, i.e. has all the elements presented above and compiles. When you are done compiling all the files, proceed with the next step, implementing the method size().

    2. Implement the method size(), i.e. replace the throw statement by an iterative implementation that traverses the list and counts the number of elements. Add a test to the test class, simply to check that the method size works for empty lists. We will check the other cases when the method add has been completed.
    3. Implement the method boolean add( Comparable obj ); adds an element in increasing order according to the class’ natural comparison method (i.e. uses the method compareTo ). Returns true if the element can be successfully added to this OrderedList, and false otherwise.
    4. Add test cases in your OrderedListMain for the method add. It will be difficult to thoroughly test the implementation, but at least the size of the list should change as new elements are added. (So far, we have mostly relied on the provided JUnits. In real-life scenarios, when you do not have unit tests yet*, this is the common workflow to test small functionalities of your implementation: creating instances and calling the newly implemented methods.)
    5. Implement Object get( int pos ). It returns the element at the specified position in this OrderedList; the first element has the index 0. This operation must not change the state of the OrderedList.
    6. Add test cases in the main program to validate the methods get and add. We are now in a better position to evaluate the method add, get and size. In particular we can add elements, and use a loop to access all the elements one after the other using get. Make sure that all the methods work properly before proceeding. Do not forget that get returns an element of type Object, you will therefore need to use a type cast.
    7. Implement void remove( int pos ); Removes the element at the specified position in this OrderedList; the first element has the index 0.
    8. Add test cases for the method remove to the main class. Make sure that the method remove (as well as all the other methods) is fully debugged before continuing.

    We now have a complete implementation of the interface OrderedStructure.

  2. Write an instance method, void merge( OrderedList other ), that adds all the elements of the other list to this list, such that this list preserves its property of being an ordered list. For example, let a and b be two OrderedLists, such that a contains “D”, “E” and “G”, and b contains “A”, “C”, “D” and “F”. The call a.merge( b ) transforms a such that it now contains the following elements: “A”, “C”, “D”, “D”, “E”, “F” and “G”; b should not be modified by the method call. The class String implements the interface Comparable and could be used for your implementation.

    The objectives are to learn how to traverse and transform a doubly linked list. Therefore, you are not allowed to use any auxiliary or existing methods, in particular add, for your implementation!

    Your implementation should traverse both lists and insert the elements (values) of the other list, in order, into this list. Remember that it is better to practice now than at the final examination!

  3. Advanced (and optional topic) :
    1. Use your implementation of the class OrderedList as a starting point for creating a parametrized implementation of the following interface:
      public interface OrderedStructure <T extends Comparable<T>> {
      	int size();
      	boolean add(T elem) throws IllegalArgumentException;
      	T get(int pos) throws IndexOutOfBoundsException;
      	void remove(int pos) throws IndexOutOfBoundsException;
      }

      The added benefit of using generics will be that all the elements of a list will be of the same type. Therefore, the method compareTo( other ) will always be passed an object of the same type as the instance.

    2. Now implement the class OrderedList without using a dummy node. You should see that while it is longer, this implementation will teach you the importance of handling every special case in every method.

Files to submit:

Appendix

An empty list.

Figure 1 : An empty list.
A list with one element.

Figure 2 : A list with one element.
A list with two elements

Figure 3 : A list with two elements.
A list with three elements.

Figure 4 : A list with three elements.


Advanced section: This concept will be useful for the rest of your studies and possibly at work. We recommend to keep these notes handy in the future.

Third part

Learning Objectives

  • Learn about version control and why it is important.
  • Learn the basics of the Git version control system together with the GitHub hosting service.
  • Learn the basic Git commands, such as git init, git add, git commit, git push, git pull.
  • Intended as an introduction for students who haven't used Git before.

Why Learn Git?

A common problem when dealing with information stored on a computer is handling changes. For example, after adding, modifying or deleting text you may want to undo that action (and perhaps redo it later). At the simplest level this might be done by clicking undo in a text editor (which reverts a previous action).

A naïve method for handling multiple file versions is simply creating duplicate files with differing filenames and contents (Important Document V4 FINAL FINAL.doc may sound sadly familiar). At a more advanced level, you may be sharing a document with other people and, rather than just undoing and redoing changes, wish to know who made a change, why they made it, when they made it, what the change was and perhaps even store multiple versions of the document in parallel. A version control system (such as Git) allows all these operations and more.

Version control systems can therefore solve the problem of reviewing and retrieving previous changes, allow single files to be used rather than duplicated, and allows for collabortation with several people. For these reasons, many organizations and companies use a version control system designed to track changes in the source code and other text files during the development of a software. Version control systems have functionalities such as storing, updating, and recording any changes made.

There are two main models (or types) of version control software: the Client-Server model and the Distributed model.

  • Client-Server model: Developers use a shared single repository. Some examples include:
    • Open source: CVS, Subversion, Vesta, etc.
    • Proprietary: Microsoft Team Founday, Helix, etc.
  • Distributed mode: Each developer works directly with his or her own local repository, and changes are shared between repositories as a separate step. Some examples include:
    • Open source: Git, SVK, Fossil, etc.
    • Proprietary: Visual Studio Team Services, Plastic SCM, etc.

You may have heard of or used some of these version control systems, but in these set of notes we'll be focusing on the Git version control system.

Git is a particularly popular version control system to use and learn because it is open source, is easy to learn and has a tiny footprint with lightning fast performance. It outclasses many other tools with features like cheap local branching, convenient staging areas, and multiple workflows.

Using a version control system such as Git is also worthwhile when working on a group project, where you have the option to show case your projects publicly, such as providing a link to your LinkedIn profile. This makes it very easy and practical for organizations and companies that are looking to hire to get to know how you approach problems and how you code, based off your coding history. In adition, knowledge of how to use a version control system is one of the top things organizations and companies look for when hiring.

Introduction to Git

Git is a version control system so that you can record all your changes to your code and collaborate with others. A Git Repository is basically a folder that is managed by Git, where all changes to its contents can be recorded. After installing Git, you can turn any folder on your computer into a Git Repository by typing the following command:

git init

The best way to think of Git is that you record snapshots of your code.

  1. You make change to your files.
  2. You mark the files that you want to be part of the next snapshot.
  3. You create the snapshot with a message. We call these snapshots “commits”.

Git Local

Let’s say we have a folder of files on our local computer in "my_folder".

  • index.html
  • about.html
  • home.html
  • contact.html
  • style.css
  • main.js
  • README.txt

And let’s say we make some changes to files in "my_folder"...

  • index.html
  • about.html
  • home.html
  • contact.html
  • style.css
  • main.js
  • README.txt

Then the typical workflow for commiting these changes as shown in Figure 1 would be:

  1. Make changes
  2. git status
  3. git add <files>
  4. git commit -m “Message”

Note: "git status" command displays the state of the working directory and the staging area. Before adding and then commiting changes, it's a good idea to first check which changes have been staged, and which haven't.

Hint: "git add ." is a very common way to just add all modified files to the staging area.
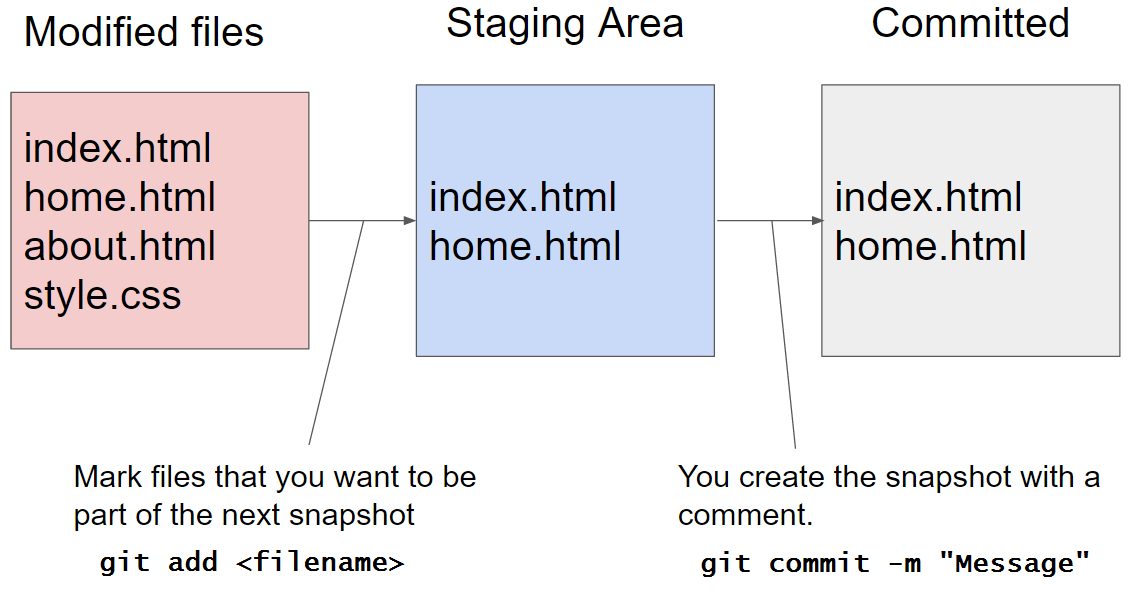
Typical Workflow.

Figure 1 : Typical Workflow.

Git Remote

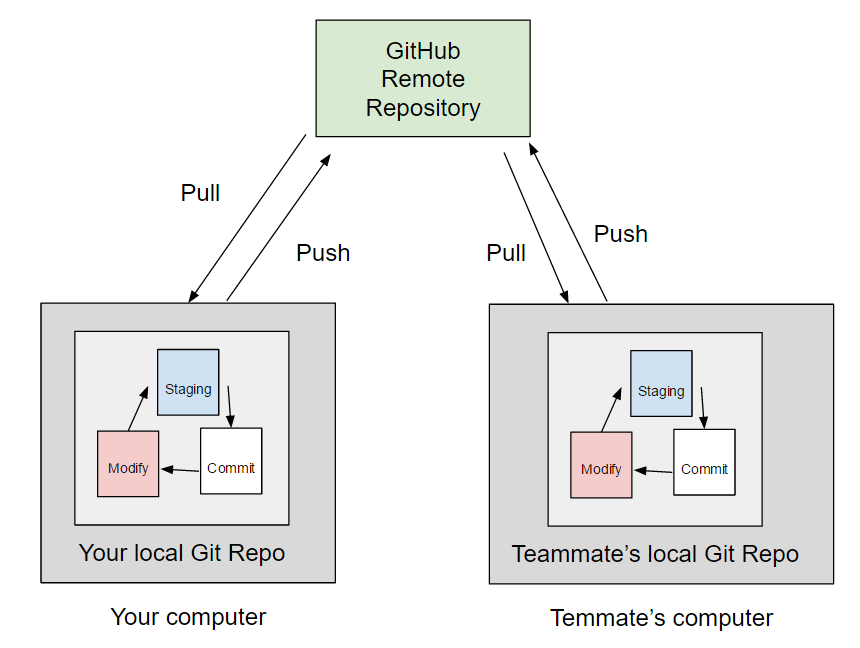
After a while, you’ll end up with a bunch of snapshots or commits on your Local Git Repository. How do you share this with your teammates? With Git Remote, you agree upon a central place to synchronize your repository with. Then your teammates can synchronize their repositories with that central place. This central place is called a “Git Remote Repository”.

Remote Repositories are just Git Repositories that you synchronize with. After you synchronize, your local repository and the remote repository will contain the exact same information (all the snapshots, commits, etc.). You can set up your Git Remote repository anywhere, but we’re going to use a service called GitHub to host our git remote repository, as shown in Figure 2.
GitHub Remote Repository.

Figure 2 : GitHub Remote Repository.

To start synchronizing with a Remote repository, you

  1. Create a Remote Repository on Github.
  2. Add its address to your computer (local).
git add remote <name> <git address>
			

For example:

git add remote origin git@github.com:myusername/myRepoName.git
			

git push

How do you synchronize your local repository with the remote one? First you can push up your changes to the remote respository.

push <name of remote> <name of branch>
			
For example:
git push origin master
			

git pull

You can grab the latest changes from your remote repository using

git pull

Your teammates can also get the latest snapshots using the command. It is recommended to git pull first to obtain the latest snapshot, before using git push.

Recommended way to proceed for personal practice

  1. Install Git (https://git-scm.com/downloads).
  2. Try out Git locally on your computer.
  3. Sign up for GitHub Account (https://github.com/) (Use your student email address to get the advanced version for free!). WARNING: GitHub uses private and public repositories. If you use GitHub when working on a class assignment, make sure that the repository is PRIVATE to avoid nasty surprises!
  4. Setup a personal remote repository on GitHub.
  5. Practice pushing from your local repository (on your computer) to the remote repository (on GitHub).

References

Introduction to Git was taken from Casey Li's slides. For more information on GIT we highly recommend the following videos "Gitting to Know You".
Forth part

Create and submit a zip folder (1 point)

Instructions

  • Create a directory lab10_123456, where 123456 is replaced by your student number.
  • Inside this directory, place the .java files for this lab. Include only your source code. Do not include any class files or any other files; only Java files.
  • In this directory, also create a file README.txt which is a text file containing your name, student number and a brief description of the content of the directory:
    
                Student name: Jane Doe
                Student number: 123456
                Course code: ITI1121
                Lab section: B-2
    
                This archive contains the 3 files of lab 10, that is, this file (README.txt),
                plus OrderedStructure.java, OrderedList.java.
    
              
  • Create a zip file lab10_123456.zip containing the directory lab10_123456 and all of the java files.
  • Verify that your archive is correct by uncompressing it somewhere and making sure that all the files and the directory structure are there.
  • Submit the archive using https://uottawa.brightspace.com/

Important remarks!

We are using automated scripts to test and grade your lab submission. Therefore, you must follow these instructions exactly. In particular:
  • Your naming of all the files and methods must be exact. Copy/paste the starter code provided during the lab to avoid problems.
  • You MUST submit a .zip; not individual files; not a .rar, not a .7z, or anything else.
  • All the required java files must be present and must compile (that is, running javac *.java must not produce any errors), even if you were unable to complete an exercise.
  • Even if you could not solve an exercise's solution completely, you have to hand in a file with the methods that compiles (you can put "return 0" if you gave up).
  • Your submission is due by Tuesday 11:59PM the week after the lab. You can submit as often as you want before then, but not after. Only your last submission will be considered.

JUnits

To help you making sure that your code is correct, we have prepared some JUnit tests.

Resources

Table of Contents