First Part
Editing, compiling and running
Learning objectives
- Learning the requirements for this course regarding assignments,
- Becoming familiar with the programming environment, and
- Editing, compiling and running Java programs
1. Review of the main code conventions of Java
Take a few minutes to review the code conventions for the Java programming language. Refer to the conventions when solving your assignments. Up to 20% of the assignments’ grades concerns the conventions and the clarity of your code.
- java.sun.com/docs/codeconv/html/CodeConvTOC.doc.html.
- www.site.uottawa.ca/~turcotte/teaching/iti-1121/assignments/directives.html
Installation of Java Development Kit (JDK)
For Windows
If you have a personal computer and do not yet have the JDK, you will need to install it.
To check if you have the JDK or not, open a command prompt window (type “command prompt” or “cmd” in the start menu bar) and type the following command:
for %i in (javac.exe) do @echo %~$PATH:i
If you have already installed the JDK, it should return its path; it should look similar to this:
for %i in (javac.exe) do @echo %~$PATH:i
C:\Program Files\Java\jdk1.8.0_111\bin\javac.exe
If you do not have the JDK installed, go to the Oracle Website select the most recent “Java SE Development Kit” for your operating system and install it. Note the installation path. Once the installation is completed go to the installation folder, then the bin folder. Copy the path, (it should be similar to "C:\Program Files\Java\jdk1.8.0_111\bin ").
We now need to add a local variable.
- In the start menu, search for “computer” or “this PC”, right click and choose Properties
- Click on “Advance system settings”
- Click on “Environment Variables”
- Click on “New”
- For the “Variable name” line, enter “PATH”. For the Variable value, paste the folder path that you previously copied
- Click on “Ok”
- Check again if the JDK is installed properly using the command line (as previously explained) to verify that the installation was successful
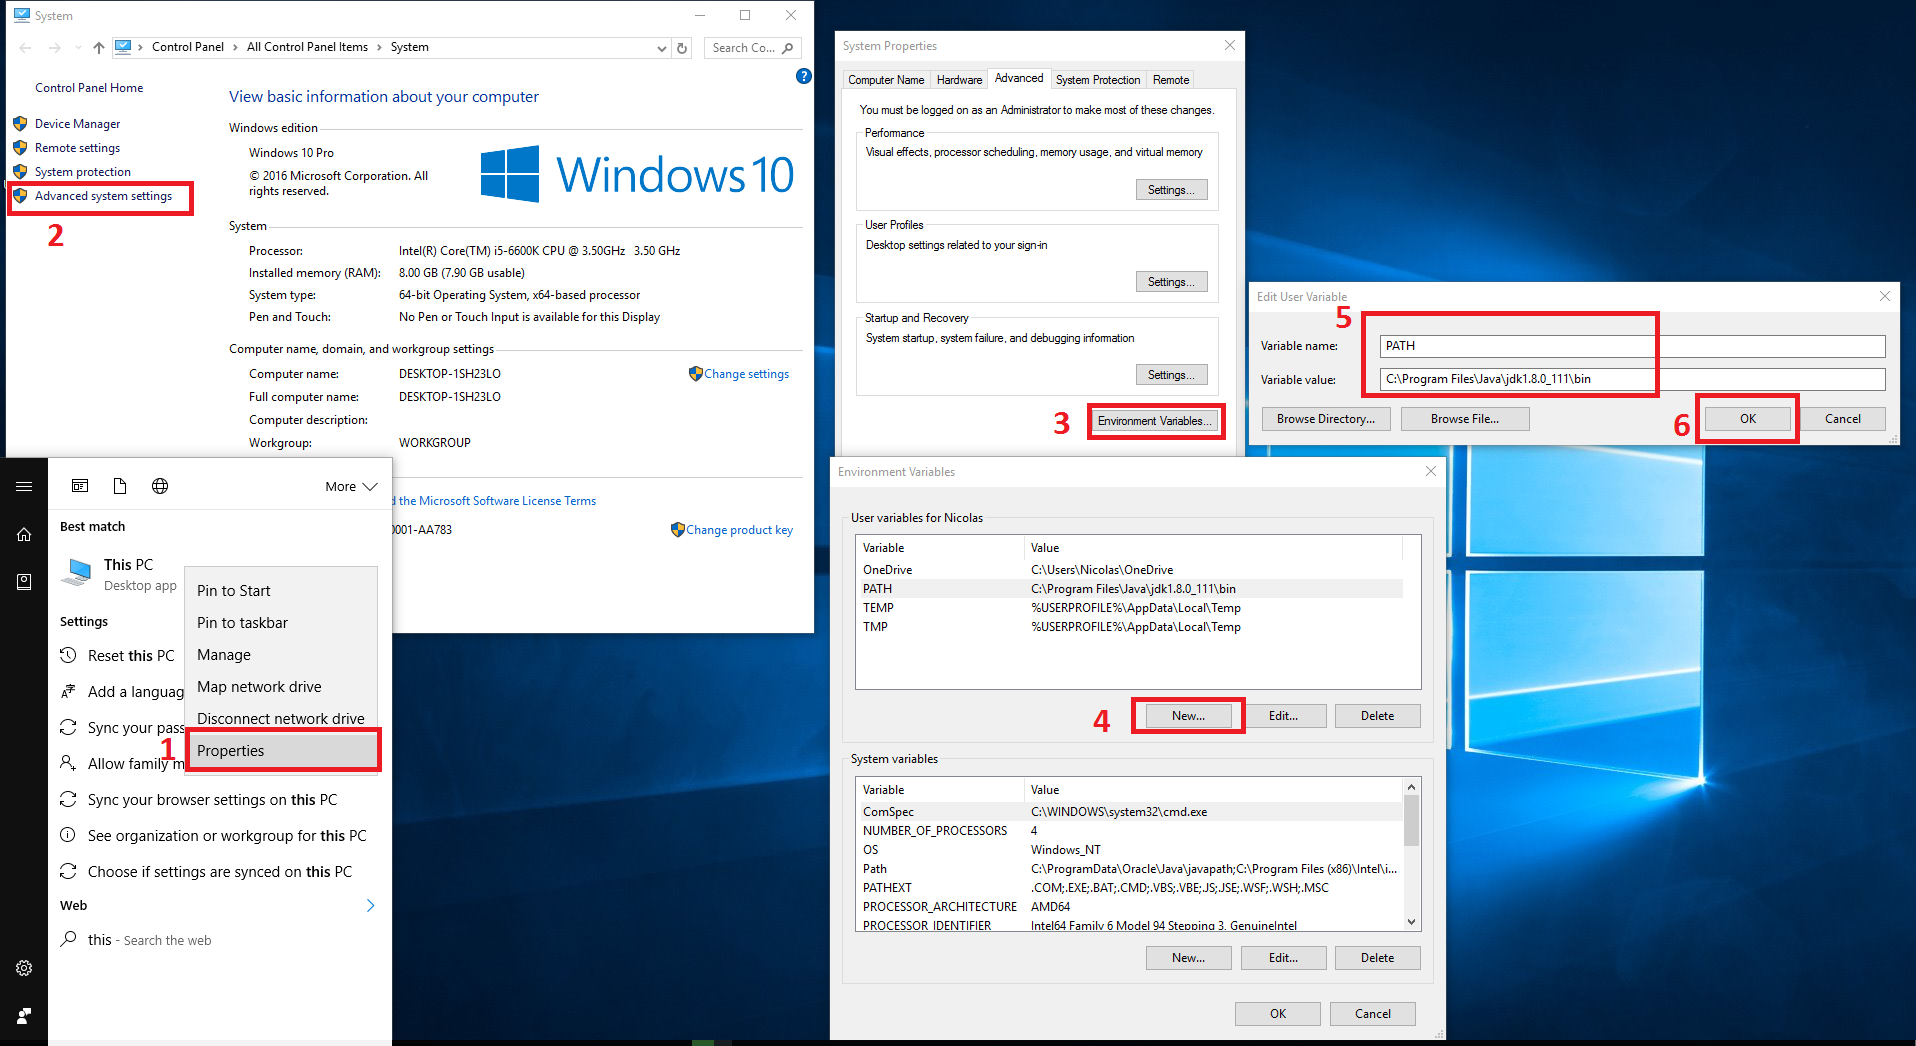 Figure 1 : Steps to add Environment variables in Windows 10
Troubleshooting
I already have a variable named PATH, what should I do?
It is normal that you already have a local variable named PATH, simply click “edit” and add the directory path to the end of that variable. Make sure that it is separated from the rest of the variable by a semicolon (;)
I get the message “ECHO is on” instead of the JDK path.
The “echo” command will by default return “ECHO is on”, this probably means that you do not have the JDK installed or that the local variable is not set properly.
General tips:
- Make sure that the path is to the java JDK and not the JRE
- Make sure that you only have one version of the java JDK
- Make sure to start a new instance of the command prompt after installing the JDK or changing a local variable
- Make sure that your local variable PATH contains only one reference to the JDK
For Mac OS
To check if the JDK is installed, open the terminal (Go -> Applications -> Utilities) and insert the following command:
which javac
If the JDK is installed you should see a path similar to this:
/[user]/bin/javac
If you do not have the JDK installed, go to the Oracle, Website select the most recent “Java SE Development Kit” for your operating system and install it.
Check again if the JDK is installed properly using the terminal (as previously explained) to verify that the installation was successful
3. Source code editor
You should clearly understand concepts such compiler, source code editor and Java Virtual Machine — JVM. Programming environments such as Netbeans and Eclipse integrate these components into a so-called “Integrated Development Environment” (IDE), which makes it easier to develop code, but makes the boundaries between the components fuzzy.
A source code editor is a text editor designed specifically to edit source code of programs – see for example Figure 2. These software usually have the following characteristics:
- Language syntax highlighting. Typically, languages elements such as keywords, parameters and strings are displayed differently. It makes it easier to read and debug code. For example, if you forget to close a string, the text that comes afterward will still be highlighted as a string (try it!).
- Source code indentation. You editor understands a set of rules to indent your code. This too facilitate reading and debugging code. For example, if you forget the parenthesis around an else block, only your first line of code will be right-indented.
- Bracket matching ({},(),[]). When you position your cursor on a bracket, the corresponding opposite bracket will be highlighted, again helping with reading and debugging code.
- Language keywords auto-complete.
 Figure 2 : Editing a “selection sort” program using the source code editor Notepad++ in Windows.
Here are some popular source code editor:
- Notepad++ (Windows, http://notepad-plus-plus.org)
- Sublime Text (Mac OS, Windows, Linux, http://www.sublimetext.com)
- TextWrangler (Mac OS, http://www.barebones.com/products/textwrangler/)
- TextMate (Mac OS, http://macromates.com)
- Emacs (Mac Os, Windows, Unix/Linux, https://www.gnu.org/software/emacs/)
Use your favorite editor or development environment (Notepad++ is the recommended environment here) and create a simple “Hello World” program. A “Hello World” program simply consists of a main method that displays the String “Hello World”. Name this class HelloWord. Copy the following code into your editor and save it as HelloWorld.java. Save the file in a folder named "lab0" on your desktop.
1 public class HelloWorld {
2 	public static void main(String[] args) {
3 		System.out.println("Hello World!");
4 	}
5 }
Line by line explication of the code:
- Declaration of the class named “HelloWorld” using the keyword class. The keyword public means that there is no restriction to accessing the class.
- Declaration of the main method, this method is special: it is the starting point of the application. Its parameter (what it gets within the parenthesis) is an array of String named “args” by convention. The main method always has this signature.
- We use the System class from the Java core library. The class System contains the field out which represents the output of the program (where it will display information). We use the method println that prints (write) any String it gets in parameters on a new line. Here it writes “Hello World!”.
- Closing the main method.
- Closing the HelloWorld class.
4. Compiling and executing a program from the command shell
Open a command prompt window (or terminal for Mac users). Use the command dir to display the files and folders in the current directory. Use the command cd to change directory. Here is an example of the procedure, commands are preceded by the symbol >
 Directory of C:\Users\Admin

01/02/2017  10:31 PM    >DIR>          .
01/02/2017  10:31 PM    >DIR>          ..
01/04/2017  10:42 AM    >DIR>          Desktop
01/01/2017  08:04 PM    >DIR>          Documents
01/04/2017  09:56 AM    >DIR>          Downloads
               0 File(s)              0 bytes
              3 Dir(s)  361,593,483,264 bytes free

C:\Users\Admin>cd desktop

C:\Users\Admin\Desktop>dir
 Directory of C:\Users\Admin\Desktop

01/04/2017  10:42 AM    >DIR>          .
01/04/2017  10:42 AM    >DIR>          ..
01/04/2017  10:42 AM    >DIR>          Lab0
               0 File(s)         0 bytes
               1 Dir(s)  361,593,556,992 bytes free

C:\Users\Admin\Desktop>cd lab0

C:\Users\Admin\Desktop\Lab0>dir

 Directory of C:\Users\Admin\Desktop\Lab0

01/04/2017  10:53 AM    >DIR>          .
01/04/2017  10:53 AM    >DIR>          ..
01/04/2017  10:53 AM                 124 HelloWorld.java
               1 File(s)              124 bytes
               2 Dir(s)  361,592,205,312 bytes free
Make sure that the current directory contains the file HelloWorld.java.
Compile the program HelloWorld.java
> javac HelloWorld.java
the symbol “>” is not part of the command, this is simply the prompt, in all my examples. If there were errors, fix them, and compile your program again. If the compilation is successful then you should see a new file in that directory. Its name will be HelloWorld.class. The .class files contain “byte-code” programs akin to the machine code for microprocessors.
Byte-code is executed by an interpretor called the Java Virtual Machine (JVM).
In order to execute your program, type the following in your command window (making sure that the current directory contains the file HelloWorld.class).
> java HelloWorld
Hello World!
The result of your println statement can be seen in the command window. Here, java is the “Java Virtual Machine”. The JVM reads your program’s byte-code, one instruction at the time, and performs the necessary actions.
The following video gives a summary of the processes described in this section. Make sure that you understand every step as they will be necessary throughout the session.
Video 1 : Compiling and executing a program from the command shell
To further your understanding of the steps of compilation and execution, make some voluntary mistakes in your code, try to compile it (using javac HelloWorld.java) and look at the results. We recommend that you try to… :
- Remove the ';' after System.out.println("HelloWorld")
- Modify the name of the class without changing the file name
- Removed an opening bracket '{'
- Remove a closing bracket '}'
- Remove one of the " from the argument in the method println
- Print you age ;)
You will quickly realise that a simple mistake can cause many errors. We strongly recommend that you compile your code often to avoid errors piling up making it hard to debug!